

WordPress truly makes many things easy. Including adding Google Analytics to WordPress. So today in this article we will learn about Google Analytics and the different ways you can integrate Google Analytics to your site.
Google Analytics is a free tool provided by Google to understand how your customers interact with your site. It basically helps you gauge the effectiveness of your website marketing efforts. Helps you see at a glance, what is working and what is not. So, you can make improvements to your site to make it more user-friendly and search engine friendly.
There are many paid tools in the market that you can splurge your money on. And still not come close to the benefits that this free tool offers. Therefore, the first step when you launch a website is to integrate it with Google Analytics.
Okay, so before we start with the steps to adding Google Analytics to WordPress, let us go over a little in-depth. And understand a bit more about Google Analytics and why you should be using it.
Google Analytics Features
By adding Google Analytics to WordPress you get access to a host of metrics about your site.
So, what are some of the features that make this tool indispensable for understanding your website audience? So much is packed into Analytics that one can get a little overwhelmed when they first see the interface as a first-time user.
But once you start to get comfortable and browse around, you understand the significance of the data that it provides you with. It can help you make important data-driven decisions, instead of going with your guesswork.
Helps You See Your Traffic Sources
Google Analytics helps you see your sources of traffic. These are the sources that are sending traffic your way. These are potential customers. So, the more you know about your source, the better you can aim your marketing efforts.

The above image shows how Analytics segregates your traffic Channels broadly into four categories. You can understand which channel is driving you more traffic. And which channels are not working as per your expectations.
You can drill down further into each of those channels and it will show further details for each. For example, you might want to how good you are performing in Organic Search. So, you will click on “Organic Search”, it will display keywords that are working for you.
You can filter your results further by Source, Landing Page, Acquisition, Behaviour, Technology etc.
If you choose Source, it will show you all the different search engines that are sending you traffic. Landing page would display the best-performing pages on your site and so on.
See the Bounce Rate for Your Site
Bounce rate is an important metric that shows how your users are interacting with your site. Are they finding your site interesting, informative and helpful enough to stay on your site? Or are they not finding what they are looking for?
A higher bounce rate would usually indicate that there is something wrong either with how your site is designed or with your content.
Too many interstitials and intrusive pop-ups can hinder user experience. Users may decide to bounce back from where they came, as bad User Interface (UI) can be the cause of a poor User Experience (UX).
Therefore, having this metric sitewide, and at a page-level is more than you can ask for.
You can look at the pages with higher bounce rate. And make changes to either the UI or the content on those pages to bring down the bounce rate as much as possible.
Define Goals & Measure Conversions
Google Analytics lets you define and measure your goals. You can define a goal & set a path that users must follow to get to your goal. Basically the sequence of pages they navigate to get to your goal.
You can also define an action that would be perceived as a goal. Like adding an item to the cart, or filling up the quote form.
You can set multiple goals and track their conversion rate. If a particular path is not converting well, you can analyze it further and take appropriate action.
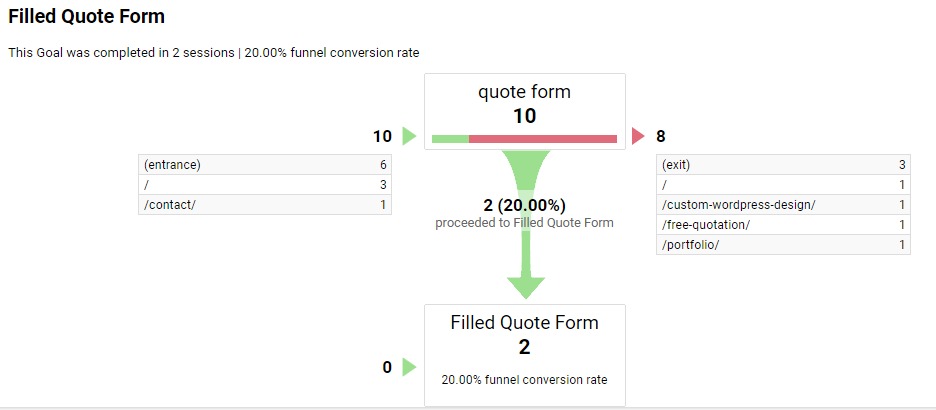
The “Funnel Visualization” in Analytics lets you visualize how your users are entering the funnel. How many of them are converting, and how many are moving onto other web pages. Helps you understand and perfect your funnel for better conversions.
Learn About Audience Demographics
Add Google Analytics to your site and you get detailed metrics about the users visiting your site.
It is quite interesting to know the ratio of males to females visiting your site; The browsers they are using; The operating system they are on. Their primary language set in their browsers. And the country and city they belong to.
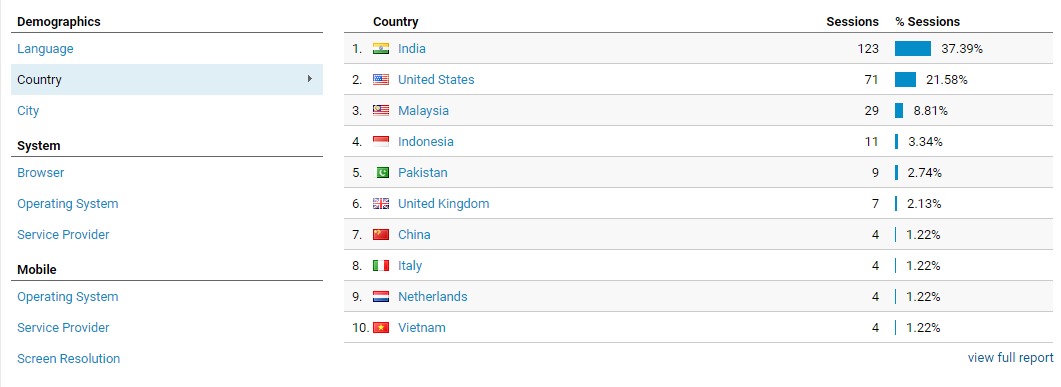
The image above shows our website visitor’s demographics. Most of our visitors are from India, followed by the United States.
It gives me some interesting data there. Some of the countries listed there may not be what I am targeting for. And some of the countries I am targeting may not be listed there. So at least I know where to focus my energies now.
It also tells you the Screen Resolution people are using to view your website. If you don’t have a Mobile Optimized Website yet, it is high time you got one for yourself.
Some articles of interest:
- Why Your New Website Should Be Responsive (Mobile Friendly)
- 10 Reasons Why Mobile Optimized Site Helps Grow Your Business.
How to Sign up for a Google Analytics Account
Now let’s see the steps involved in setting up Google Analytics on WordPress. The first step involves signing up for a Google Analytics account. You need to have a Google account to sign in to Google Analytics.
Step 1: Login or Sign Up for a Google Account
If you have an existing Google account, make sure that you are logged into it. If you have multiple Google accounts, which many people do for valid reasons, then sign in to the account that you want to associate with this website.
If you don’t have a Google account, sign up here. Once you have signed up, make sure to log in into your Google account.
Step 2: Sign up for Google Analytics
You will need to sign up for Google Analytics with your existing Google account. So make sure you are logged into the right one.
Now the URL to access Google Analytics is this: https://analytics.google.com/
Once you access the above URL and your Google account has no Analytics account associated with it, you will get a screen like this.
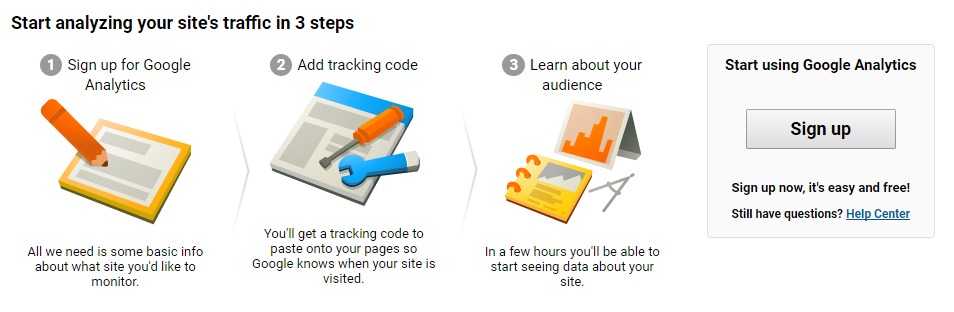
Just click on the “Sign up” button on the right, and it will sign you into your Analytics account with the Google account you are currently logged in with.
Step 3: New Google Analytics Sign up form
You will be presented with a screen as shown below to create a new Analytics account which will be associated with your existing Google account.
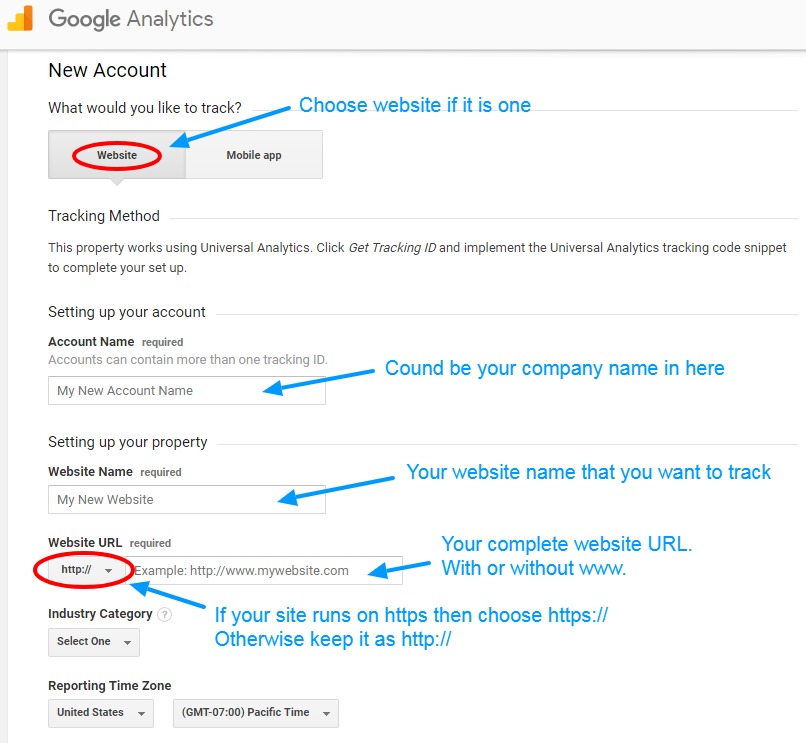
You will need to fill in the details to get the tracking code for the website.
It starts with asking you what you would like to track. If this is a website you want to setup Analytics for, then choose Website.
The Account Name could be your company account. And the Website Name is obviously the name you call your website with.
Special attention should be given to the Website URL field. If your website runs on HTTPS, then make sure to choose https:// in the Website URL section. If you run your website under HTTP, keep it as http://.
Once you have chosen your Industry Category and Reporting Time Zone, you are good to go.
Once you have filled in all the details, you can click on the Get Tracking ID button at the bottom of the page. Once you have agreed to the Google Analytics terms and service, you will be taken to the page with the tracking details.
Finally You Get Your Tracking Code
Once you have completed the above steps, you are taken to the page with your tracking code. I am showing it to from one of my existing accounts. The page you see will be similar to the image below:
![]()
What you see in the box is your actual tracking code.
We have completed the part of signing up for Google Analytics. Now we will move on to the part where we actually put Google Analytics on a website so we can start tracking.
How to locate your Analytics code
For the newly signed up users, you are already on the page where you have the Analytics code in front of you.
But for those of you, who are revisiting Analytics to get the code again; I will give you the steps to easily locate it in Google Analytics.
- Login into your Google Analytics account.
- Choose the right Account from the dropdown list located at the top left corner of the page. This is the account for which you want to get the tracking code for.

- Then choose the right correct property and its associated view.
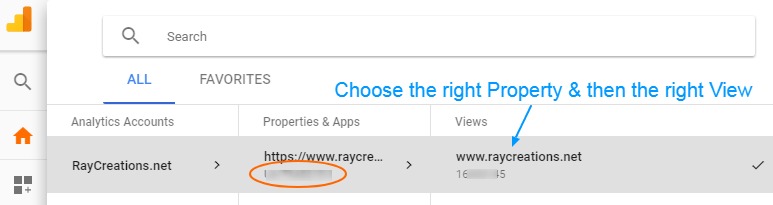
In the red circle, you can see the Tracking ID. Many plugins just need the tracking ID.
But we will navigate to the page which has the complete tracking code. And also, the instructions on how to setup up the code on your site. - Next, locate the Settings wheel icon at the bottom of the left navigation menu.

It will take you to the Admin area for this account.
- Now simply click on the “Tracking Info” under the “PROPERTY” tab, and select “Tracking Code” from the Menu list.
You will be taken to the following screen as already shown above.

So, we have basically seen how to re-locate the Tracking code if we need to.
How to Install Google Analytics on WordPress
We will look at three different ways we can do this. Some are as simple as installing a plugin and you are done.
But many people do not like adding plugins for each little thing they want to get done on WordPress. Why? Because each plugin tends to add tons of unnecessary code that adds to the bulk of the site.
Too many plugins will tend to slow down WordPress, so we should try and keep the plugins to the absolutely necessary tasks. If something can be accomplished by adding a few lines of code, it is not worthwhile to add a whole new plugin for it.
But here I would also like to add that some plugins go way beyond just adding the tracking code to your site. They provide you with a host of insights into your traffic, visitors, and their sources. So, if that is something that appeals to you, an Analytics plugin may not be such a bad idea.
Also, since it is one of the easiest ways to do it, we will look at it first.
Installing Google Analytics on WordPress Using a Plugin
I have chosen a random plugin to walk you through as an example. We will use “Google Analytics for WordPress by MonsterInsights”.
There are hundreds of other Analytics plugins in the WordPress Repository that you can use. Simply search for them online. However, for this example, we will use the above-mentioned plugin.
To Install the Plugin and to Integrate Google Analytics with WordPress, do the following:
- Login to your WordPress Dashboard > Plugins > Add New.
- From within the “Add Plugins” screen, search for “monsterinsights”. And the plugin should be listed as the first plugin in the search results below. See image below:
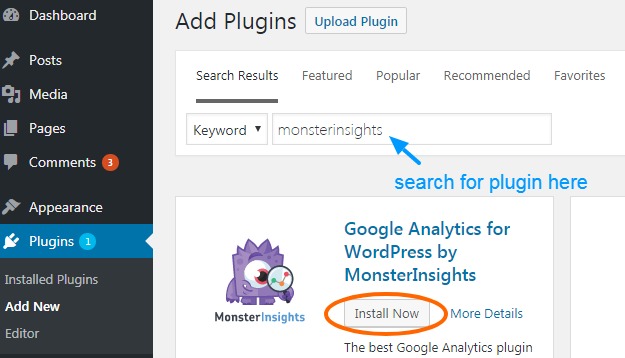
Now all you have to do is install the plugin by clicking on “Install Now” button that I have highlighted in the image above.
- The button will show as “Installing” and then “Installed” when it has finished installing. Then it will change to “Activate”.
You will need to click on “Activate” to finish the plugin installation.
- It will add a “Insights” menu item to your left navigation pane. When you click on it, it will ask you to authenticate with Google Analytics to allow the plugin to fetch data.

- When you click “Authenticate with your Google account”, you get a pop up like this:

It says, “Authenticate your Google Analytics account with MonsterInsights”. Click next to move to the next step.
- The next screen is show below:

On this screen, you will click on “Click To Get Google Code” and you will be taken to another screen to authenticate with your Google Analytics account.
If you are already logged into your Google Analytics account, you will not need to log in again.
Once you are authenticated, you will get a Google code, which you will need to enter in the text box that says, “Paste Google Code here”.
So now click on, “Click To Get Google Code”.
- You will get a Google pop up, that asks you to choose an account. Choose the appropriate Google account under which you have setup the Analytics account for this domain.
- Once you choose the right account, you will be taken to this screen.

You will need to click on “Allow” to give MonsterInsights access to your Analytics account.
Click on “Allow”.
- On the next screen, Google will give you a code to copy.
Simply switch back to your WordPress Dashboard, and enter the code in the MonsterInsights pop-up. And click “Next” to move on to the next step.
- The next screen pulls up all your Analytics accounts associated with your Google Account within the dropdown box. Select the one that is for this domain.
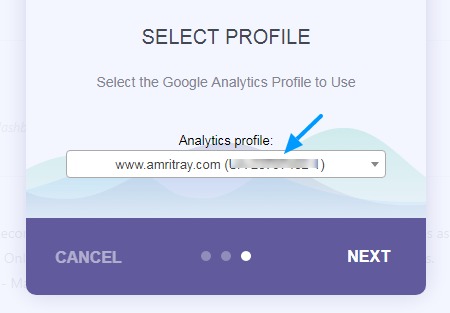
- Click on Next and you are done.

Click on “Close” to close the popup.
You have successfully installed Analytics to your WordPress site using a plugin.
If you choose other plugins to install the Analytics code to your WordPress site, it shouldn’t be very different from the one we have walked through in the example above.
How to Add Google Analytics to WordPress Without a Plugin
Now we will look at how to install Analytics code to your WordPress site without using any plugins. Though this sounds tough, technical and scary; it does not necessarily have to be like that.
Google Analytics suggests that we paste the tracking code into the <HEAD> element of every page we want to track. We will see how to do this with a WordPress site.
WordPress is a dynamic website that is built with parts like the <strong.header, footer=”” &=”” sidebar<=”” strong=””>. These are snippets of code separated into different files but are reused throughout the site.</strong.header,>
These files are called & used by all pages & posts in the site. So, if you add the tracking code in the header file, it will get added to every page & post on the site.
This would not be true with a simple HTML site, where you would need to put the tracking code manually to each & every page on the site.
-
How to Integrate Google Analytics in Website – Header File
We will look at how to include the entire code snippet into the header file of your WordPress website.
Go to your WordPress Dashboard > Appearance > Editor
And from the right navigation menu, click on header.php, as shown in the diagram below.
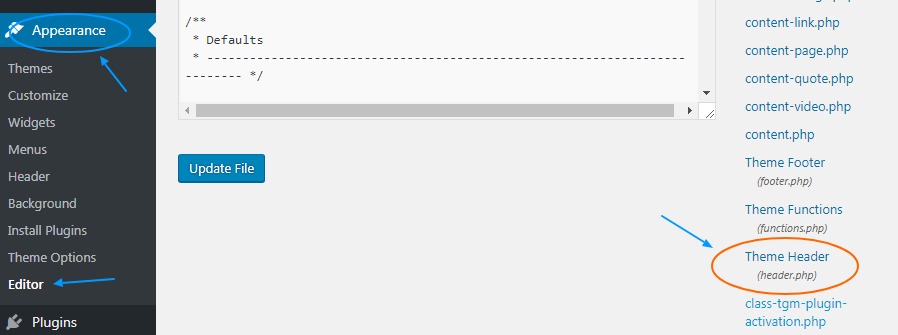
We will be editing the header file to paste our Analytics tracking code directly into this file.
See the diagram below for more details:
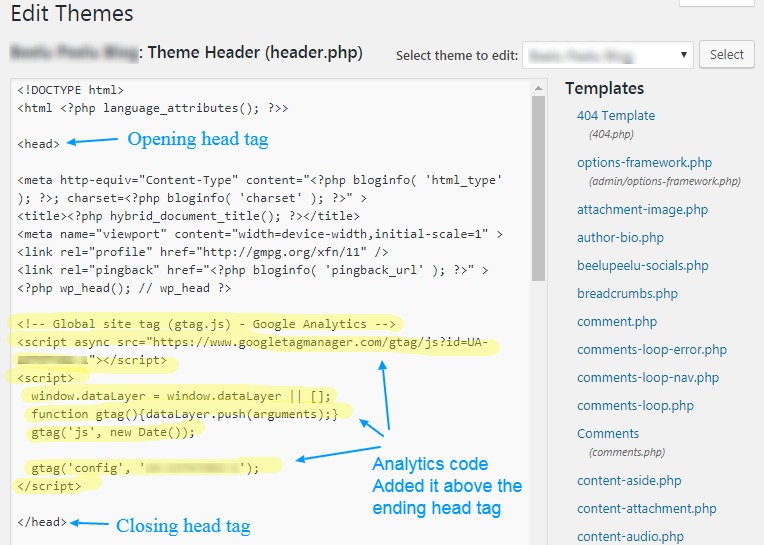
You can see the actual header file there. You will need to place the Google Analytics tracking code within the “head” section of the website.
You can see that I have pasted the code which is highlighted in yellow, just above the closing head tag.
Once you have done the above, simply click the “Update File” button at the bottom of the file to save the code.
And that’s it, you are all set. -
Add Google Analytics to Site – using PHP Include method
This method is slightly technical as it involves creating a PHP file and then uploading it to your theme folder in WordPress.
First, create a PHP file, and give it an intuitive name like, “analyticstracking.php”. Of course, you can name it whatever you want. Just make sure you remember what the file is for when you see it after a long time. Makes maintaining your site easier in the long run.
I think you can use a Notepad to create this file easily. Simply open your Notepad & then paste your Analytics code as it is in this file. Nothing more, nothing less. And save the file with the extension as .php. So that it is treated and recognized as a PHP file.
You will then need to upload the file to your active theme directory root folder. You can use a free FTP tool like Filezilla to do this.
Then you can login to your WordPress Dashboard > Appearance > Editor
And from within the Templates Menu on the right, click on the file you just created. In our case here, it is called analyticstracking.php. See the image below:
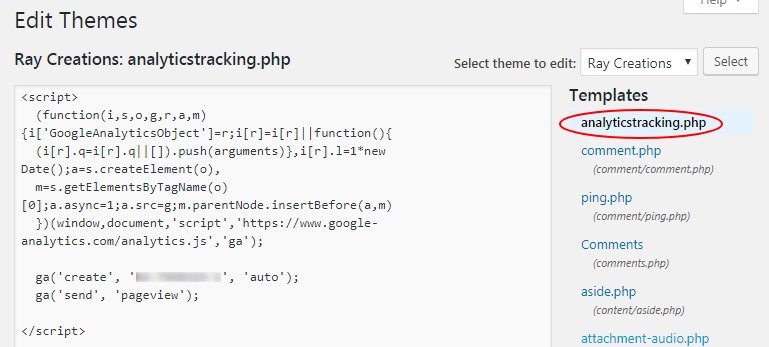
So, you know you successfully created and uploaded the file.
Now you need to “Include” the file in your “header.php” file. So that each time a page is loaded, your analytics code located in your “analyticstracking.php” file automatically gets added to the HEAD section of your website.
To include the file, simply select “header.php” file from within the “Templates” section on the right of the page.
And write this line, just after the opening <body> tag.
<?php include_once("analyticstracking.php") ?>See the image below:
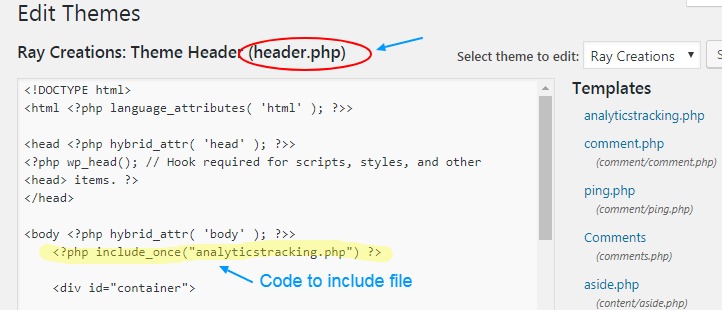
Then simply click on “Update File” to save the modified file.
And you have successfully added the Google Analytics code to your WordPress site using the PHP include method.
Summarizing The Article
In this article we have discussed the following:
- Analytics Overview & Benefits: An overview of Google Analytics & why it is important to use this free tool to track and analyze your website visitors. And loads of actionable, insightful metrics it provides you with.
- Signing Up with Google Analytics: We have seen how to proceed with signing up with Google Analytics and how to add a website for tracking with detailed screenshots & images.
- Getting Tracking Code: We have seen how to get the tracking code for first time users signing up. And for finding the Analytics tracking code for existing users.
- Adding Analytics Using a Plugin: We have seen how we can use an existing plugin to install Google Analytics to WordPress site. This is particularly good for those who don’t want to mess around with code. It is the simplest way of adding Analytics to your site.
- Adding Analytics Without a Plugin: Don’t want to add the bulk of a plugin to your WordPress site? Then you can simply add the Google Analytics plugin by pasting in the header.php file of your website. Or you can also use the include method to do this.
Hopefully, you found this article interesting and helpful. If I missed out certain details. Or if there are other ways that would help users, please let me know in the comments below.
Over to you now.
Leave a Reply