
In this article, we will learn how to install WordPress on your website.
This is a very straightforward task and does not require more than 10 to 15 minutes of your time. If you are used to it and have done this before, you can get this accomplished under 5 minutes with ease.
Most hosting providers offer cPanel as the hosting control panel with their Linux hosting. Linux is, of course, the ideal environment for WordPress. Though Windows servers can also host WordPress, you could run into issues.
In a majority of the cases, if you have a WordPress site, you are on a Linux based server and you are also using cPanel.
How Do I Install WordPress On My Website?
Okay, let’s dive right in, and see the steps you need to perform to Install WordPress on your website. We are assuming you have a new hosting account. Or that you have deleted your current website and setting up WordPress all over again.
In either case, you will either have a under construction site or have your directory being listed when you type your domain name online.
Perhaps something like this:

This tells you that you have a fresh installation and that you are ready to publish your new WordPress files to your hosting space or server.
Steps To Install WordPress Manually
Follow these steps carefully to install WordPress on any web server using cPanel.
Step 1: Download WordPress
Go to https://wordpress.org/download/ and click on “Download WordPress” to download a local copy of the latest WordPress files.
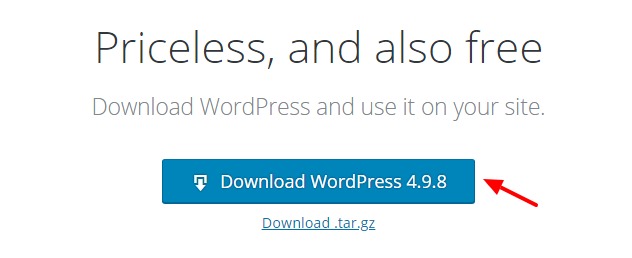
It will download a zipped copy of the WordPress files you need to install WordPress.
Save it to a location where you can access it easily. The file size is usually under 10MB and takes just a few seconds to download. If you have a slower connection, it may take longer of course.
Step 2: Upload WordPress Files to Your Hosting Account
The next step involves uploading the WordPress file we just downloaded to your web hosting space associated with your domain name.
To do that, log in to your cPanel account with the credentials provided to you by your hosting provider. If you don’t have them with you then you will need to follow up with your host so that they can resend them to you.
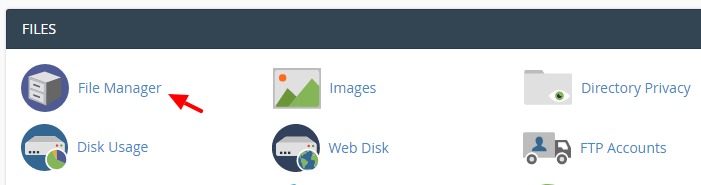
Once you have logged in, click on File Manager which is located under the FILES submenu.
It will open the File Manager window in a new browser tab. It will list all your website files and directories.
We are interested in the folder named public_html, as it houses all files that make up your website.
Click on public_html to expand the folder. As you can see that since it is a fresh installation, it does not have too many files in it. It only has the cgi-bin folder listed under it.
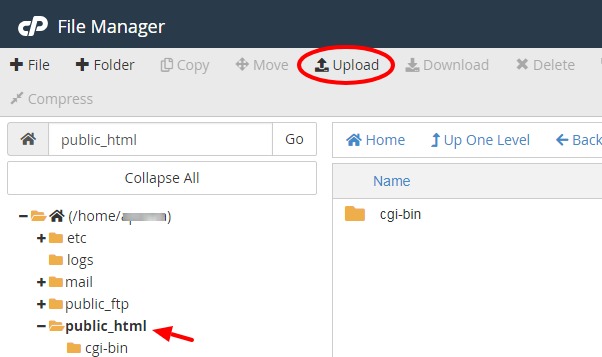
Now we will upload the WordPress files we downloaded in the first step.
To do that we will click on Upload from the toolbar, as highlighted in the screenshot above.
When you click on it, you will get the “File Upload” window open in a new tab, as you can see below.
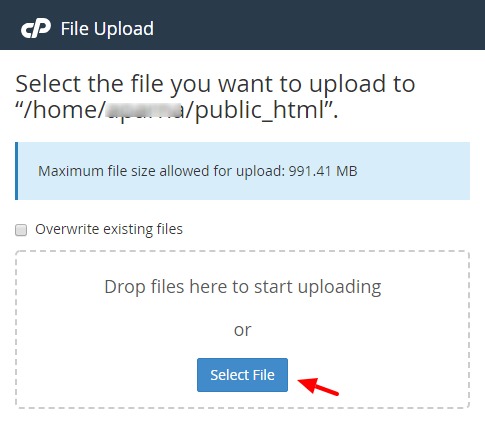
Here you simply need to click on “Select File” which will open a dialog box from where you can navigate to the file you saved earlier from step 1. Select that file and click on Open.
It will start uploading the file to your public_html folder.
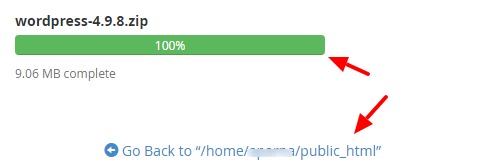
When the progress bar shows 100% then you will click on the Go Back to button to close this window and return to the File Manager window.
You can now see that the WordPress installation zip file is now listed under your public_html folder.
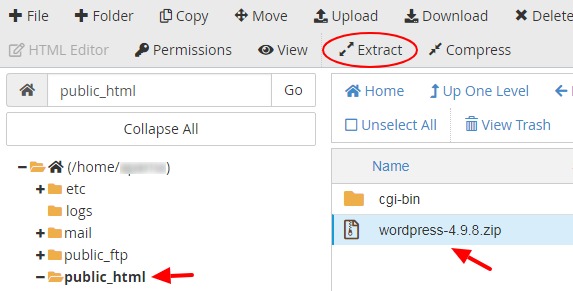
We want to unzip/extract the WordPress installation files. To do that we will make sure that the public_html folder is selected from the left navigation pane.
Then we want to ensure that we have selected the WordPress installation file as shown above. You select the file by clicking on it once.
When the file is selected, click on Extract from the toolbar as shown above.
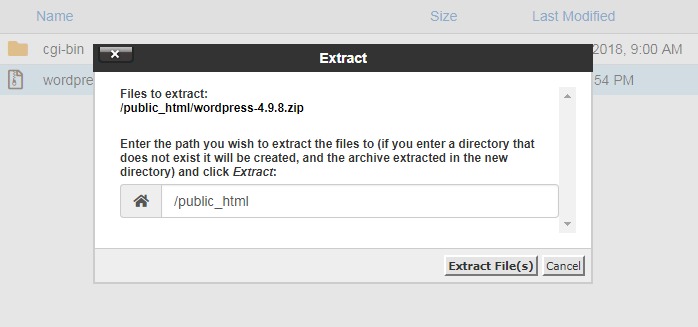
An Extract pop-up window opens up as shown above.
You can keep the directory structure the same. And click on Extract File(s) to start the extraction process.
Once it finishes, you will get another pop-up window, called Extraction Results. You can close this window by clicking on the Close button located at the bottom of this window.
You will now observe that the extracted files have been placed in a new folder called wordpress. The installation files are within this folder.
And we want to have the files moved under public_html folder, which is our root folder.
To move the files, we will do the following:
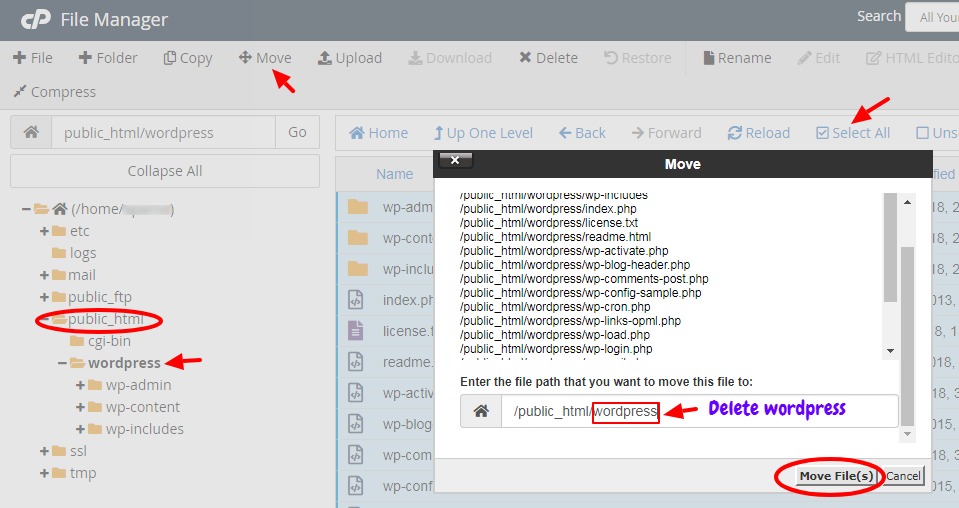
First, select wordpress folder from the left navigation pane as shown in the diagram above. It will list all the files within wordpress folder in the right navigation pane.
Then we will click on Select All, and the system will select all files displayed in the right navigation pane. We selected them as we want them all to be moved directly under the public_html folder.
When all files are selected, click on Move link from the top toolbar.
A Move dialog box pops up as shown above. It shows all the files that will be moved. And the location where the files will be moved.
Since we want them to be moved directly under public_html directory, we will change the location from /public_html/wordpress to /public_html/ by deleting the wordpress word from the file structure. See the diagram above for clarification.
Once done, click on Move File(s) to finally move them to their intended destination.
Note: We have successfully uploaded the WordPress installation files to the root directly now. However, you may wish to clean up the directory by deleting the no longer required, wordpress & the uploaded installation zip file.
To delete them, simply select those files, and click on Delete from the main toolbar in the File Manager window.
Don’t close this window/tab just yet. We will need to return to it shortly.
Step 3: Create The WordPress Database
In this step, we will create the database that we will use for our WordPress site. Let’s look at the steps involved.
Return to the cPanel Home browser window. This is the window that we originally started out with.
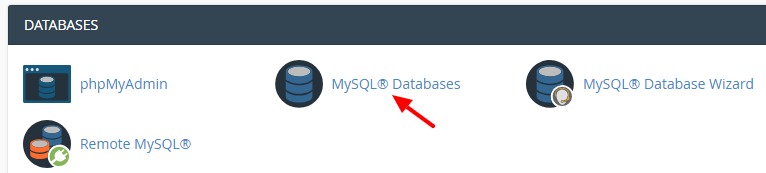
We will click on MySQL Databases from within the DATABASES subsection.
We are taken to the MySQL Databases page.
We need to do 3 things here:
1. Create new database
To create a new database simply input a name in the new Database text field. It could be any name. Like the name of your website for instance.
I have simply used db1.
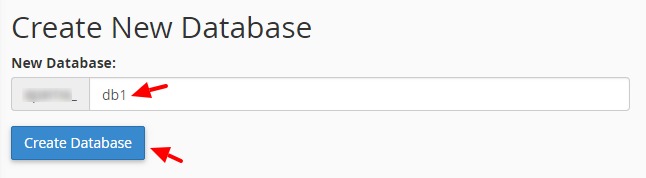
To finish creating the new database, click on the Create Database button.
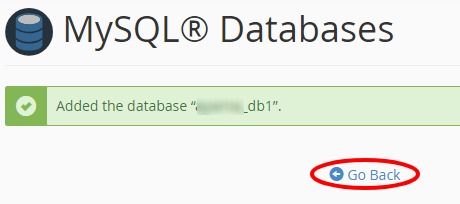
You will get a confirmation that the database has been added.
Make sure to copy the name of the database within the quotes. And copy it in a text file, preferable on Notepad. We will need it soon.
Then click on Go Back to return to the previous page.
2. Create the database user
Next, we will create the username for the database.
We will scroll down the page a bit to the Add New User section.
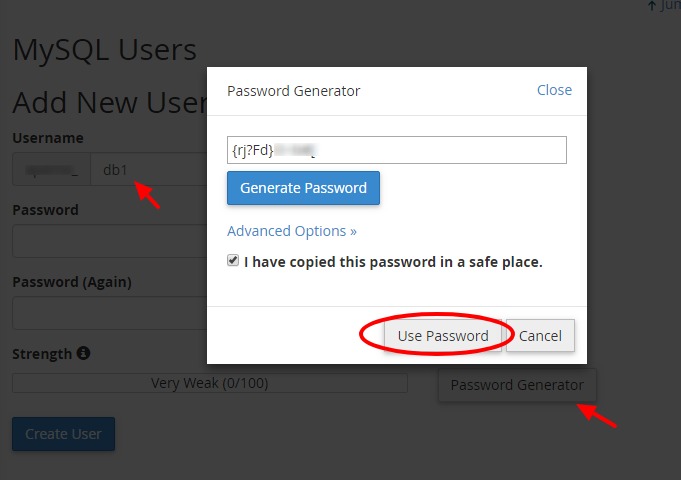
As you can see from the screenshots above, we are adding a new user to our system. In the Username field, we can give the user any name we like. I have given the same name as the database for convenience. You can give it any name you like.
It is a good practice to use strong passwords, so I am using the password generator above to create the passwords for me.
Click on Password Generator and it will open a dialog box with the options as shown in the diagram.
It will come prefilled with a strong password. If you want a different password, you can click on Generate Password and it will give you new passwords that you can use.
Once you are happy, check the option, I have copied this password in a safe place, and click on Use Password.
Your Password text boxes above will now be populated with the password you chose.
All you need do now is to click on the Create User button and a new database user is created for you.
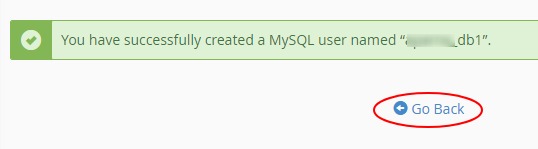
You will get a confirmation, like the above image, that your user has been successfully created. Don’t forget to copy the database username within the quotes. Make sure to copy it somewhere safe along with your database name, and password.
Then click on Go Back to return to the previous page.
3. Add the user to the database
The third step in the database creation process involves adding the database user to the database. And giving the user appropriate permissions.
Therefore, scroll down to the section that says, Add User To Database. See the diagram below.
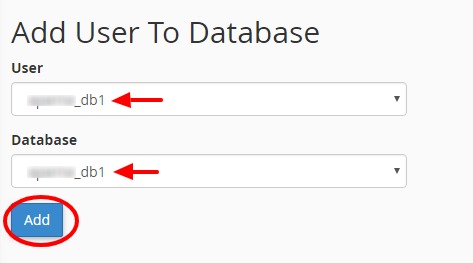
Choose the corresponding User and Database using the dropdown menu.
And click on Add.
You will be taken to the next screen. It will be similar to what you see in the screenshot below.
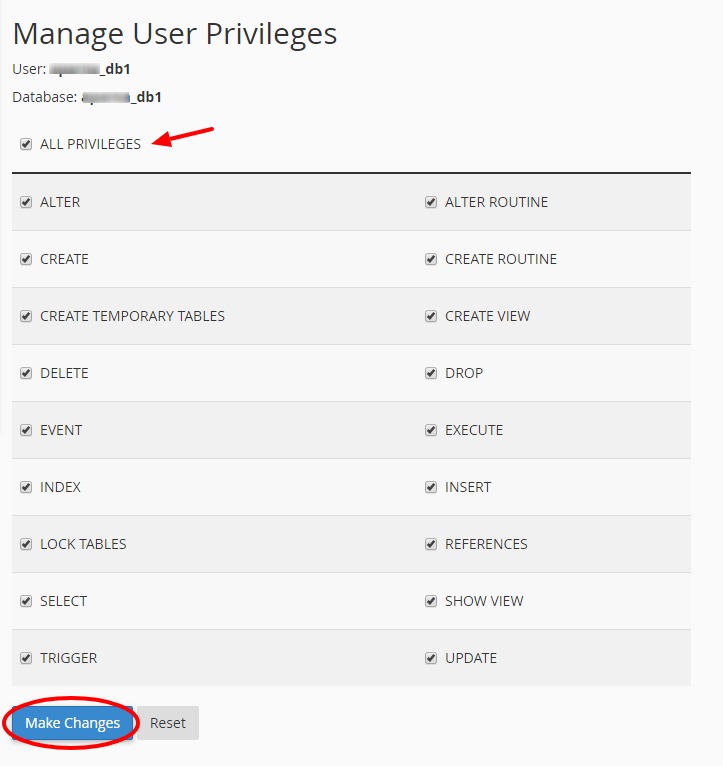
All you must do is check the ALL PRIVILEGES checkbox and then click on Make Changes, to add the user to the database and give the user the appropriate permissions.

You will get a confirmation that the privileges were saved. And you are done creating the database part. Now you can click on Go Back to return to the MySQL Databases page.
Step 4: Update wp-config.php page
Head over to the File Manager tab again. If the tab is no longer open, then open it by going over the instructions in step 2.
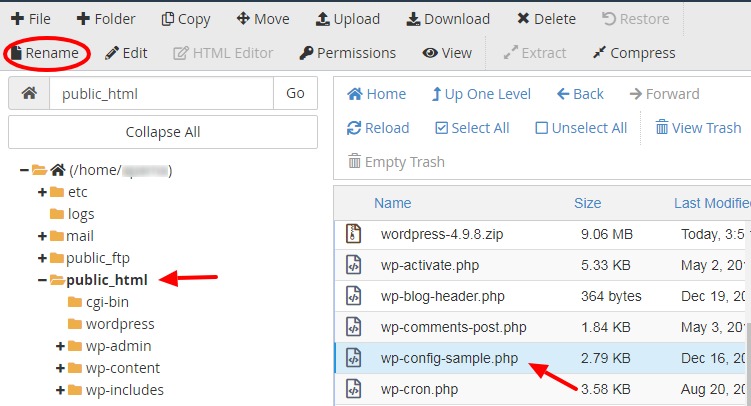
Select public_html folder from the left navigation pane. This will list all its files & directories in the right window pane. Select the file wp-config-sample.php and click on Rename.
Rename it to wp-config.php.
Then select this newly renamed file and click on Edit from the toolbar. See the screenshot below.
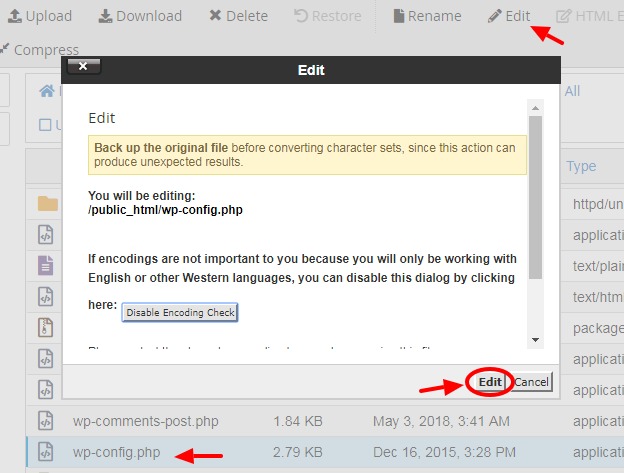
An Edit dialog box pops up. Click on the Edit button to confirm that you wish to edit this page.
This opens the wp-config.php file in edit mode. The important sections that we need to update have been highlighted in the image below.
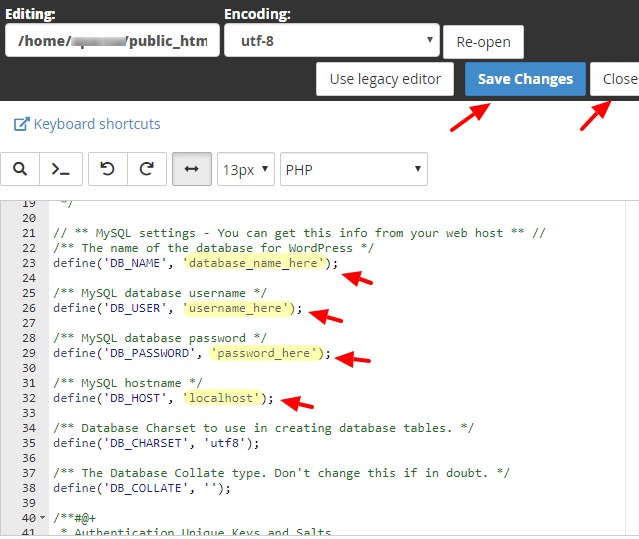
When we created the database, we saved three important credentials somewhere safe. We need to use them now.
Where it says, ‘database_name_here’, we replace that with the actual database name.
Where it says, ‘username_here’, we replace that with the actual database username.
Where it says, ‘password_here’, we replace that with the actual database password.
Where it says, ‘localhost’, we keep it as it is in most of the cases. In some rare cases, the web hosting company may have a different hostname. In such cases, you will need to get the hostname from the hosting company and replace that with the localhost.
In all the above cases, the single quotes will remain, only the text within them will get replaced.
Once you have made these changes, you will need to save the file by clicking on Save Changes. Once saved, click on Close to exit and return to the File Manager.
Step 5: Install WordPress – Finally
We now need to run the installation from a web browser.
Open any web browser of your choice. I usually work with Chrome. So I will use that. In the address bar, type your domain name and it should automatically take you to the installation page.
Another important thing to remember here:
- If you want to prefix www. to your domain name, make sure to include it when you type the domain name for installation in the browser.
- If you want to leave it out, remember not to include it when you type the domain name in the browser for installation.
Though if you make a mistake here, you can always change it later in the “Settings” section from within your WordPress Dashboard once the installation is complete.
Okay, so let’s get back to the WordPress installation again. So you have typed your domain name after making all the necessary changes we discussed above.
The browser will now redirect to the installation page at this URL: http://www.yourdomain.com/wp-admin/install.php
You will of course, use your actual domain name in place of yourdomain.com.
The first screen prompts you to set the language for your site. See the screenshot below.
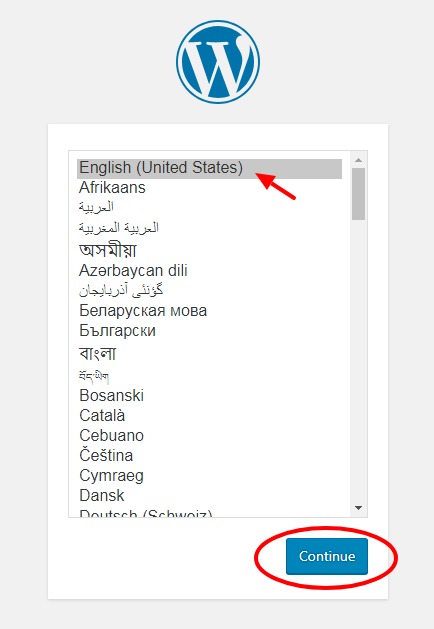
Choose the language that you want your website to be in, and then click Continue to proceed with WordPress installation. Next, you will be taken to the following screen below.
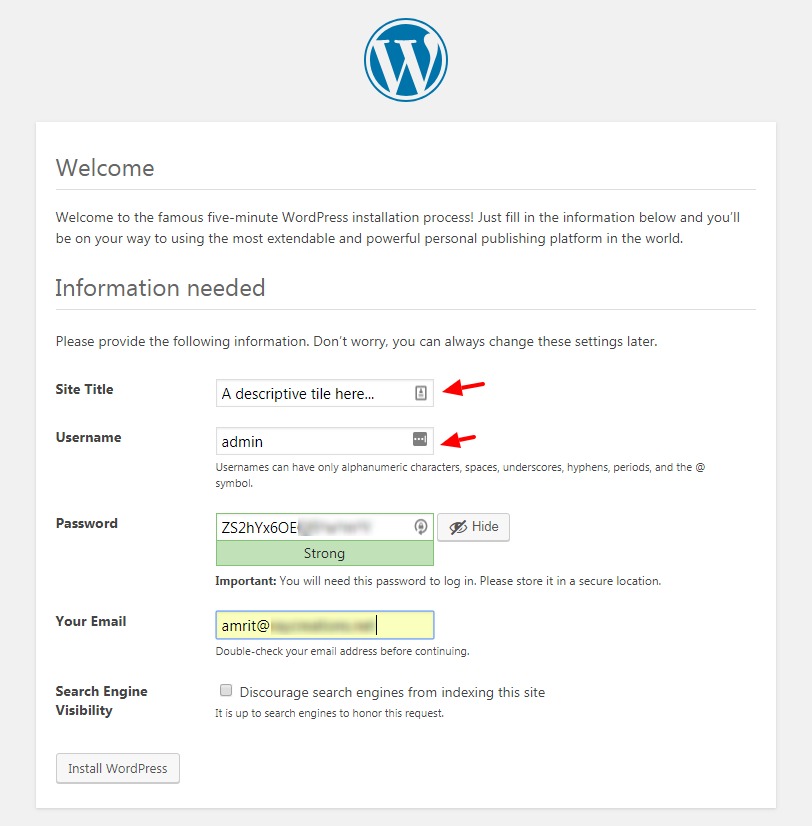
This is section is easy and intuitive. It asks you to input a descriptive Site Title, where you can input your site name.
Then you need to input your Username & Password. You can choose any username you want here. I am using admin here. The password field comes prepopulated with a strong password. You can keep as it is or input your own password there.
Next, is Your email id. It is important to double check it, because if you forget your password, then it will be sent to your email id. And if your email id is incorrect, then you will have a hard time getting in. Therefore, it is important to double check it.
Sometimes, you may want to disable search engines from crawling the site. One such scenario would be when your site is still under construction. In such a case, you may want to tick the option, Discourage search engines from indexing this site.
You can enable indexing again from your Admin Dashboard when you are ready.
When you have filled the details, click on Install WordPress and you are taken to the Success screen below.

You can now click on Log In and login to your WordPress site.
Congratulations! This finally completes the WordPress installation.
Final Thoughts
The tutorial above explains how you can install WordPress on any web server and with any host of your choice. If the hosting company is not using cPanel, then the finer details will change, but the steps will remain the same.
Also, while there are cheap web hosting options available, I would recommend using a premium hosting service to avoid any trouble in the long run.
Though the tutorial is quite long, the steps really don’t take that long. And as I said at the beginning of the article, if you do it a few times, you could complete the whole setup under 5 minutes easily.
I hope the article has been useful to you. If you stuck somewhere, or have questions or feedback, I would love to hear from you in the comments below.
Over to you now.
Leave a Reply