

Let’s quickly lay down what we are going to learn in this article. We are going to see in detail the steps needed in shifting WordPress from one server to another.
And we are also going to see how you can switch your domain name. In other words, change the domain name that is used to reference or fetch your site online.
The first option where you keep the domain as it is and simply switch from one host to another is quite straightforward. It is as easy as knowing how to take a backup and recreate your site using that backup.
The second option where you are actually changing (switching) the domain name is slightly complicated as it involves changing the site URL throughout the database. The change in your URL is the result of replacing the old domain name with the new one.
This essentially changes a lot of things for your website. It is in a way a new website now. It would affect not only how you fetch your site online, but also how Google indexes and displays it in the search results.
Though there inadvertently would be a drop in your search rankings, we can take measures and steps to minimize this. We can discuss this in another post.
Ok. Let’s first look at how to switch from one host to another.
Shifting WordPress from one server to another
The question, “How do I transfer hosting from one host to another?”, pops up a lot and all website owners must deal with it at one point of time or another.
You sign up with a host and then realize down the line that there are better options for you today. Perhaps, you are looking for more reliability, uptime, less expensive options, better support etc. Whatever, your reasons, you will find at some point in time, that you are faced with the task to move your WordPress site to another host.
Let’s look at the steps involved.
How to migrate a website from one server to another
This essentially consists of two parts. The first is to take a functional backup of your existing website. Perhaps you already have a backup as part of your regular maintenance program. And I do recommend adding backups as a necessary part of your website maintenance tasks.
However, today we will look at how to take a fresh backup manually.
The second part involves restoring the website on your newly allocated hosting with the new hosting provider.
Moving a SingleSite into a Multisite install? See here.
Step 1: Taking your existing website backup
Every hosting provider could be using their own proprietary hosting control panel, which would look different and would have different sets of options.
But the most widely used and trusted hosting automation software on Linux web servers is by far the cPanel. And since WordPress is mostly deployed on Linux servers, the probability that you will be using cPanel is the highest.
Therefore, we will use cPanel in all our examples below.
Next, I wanted to talk briefly about the two components of your website that needs to be backed up.
First is the website files, which are like web pages, that determine the information that would be displayed or fetched to be displayed on the site. For WordPress, these files reside within the wp-content folder.
This folder also stores information about the themes and plugins being used on your site. The wp-content folder, therefore, contains all the website files you need. And, therefore, is the only folder you need to back up.
The second important component you need to backup is the database, that stores all the information for your site. For example, when you fetch the “About” page of a site, the actual text is stored somewhere within the database itself.
When that page is displayed or rendered, the information is fetched in real-time from the database and displayed to you. Even the most important website configuration and settings are stored here.
That is why the database is such an important component to be backed up. Without it, your site is broken and cannot run.
So essentially, you need to backup your wp-content folder, and your database file to be able to move your WordPress site to a new server.
Let’s look at the steps below.
-
Login to your hosting control panel
.
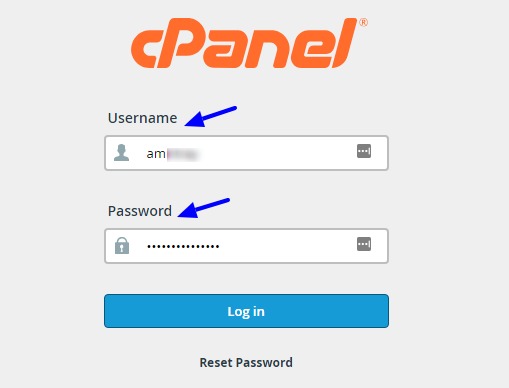
You need three things here:
1. Your CPanel URL. That is the address you will type in your browser address bar to get to your hosting control panel login page.
2. Your username.
3. And your Password.
These 3 things would have been provided to you by your hosting provider when you initially signed up with them. -
Open File Manager

Once you have logged into CPanel, click on File Manager under “Files”. And it should open a separate browser tab with the “File Manager” window.
-
Backup wp-content folder
The File Manager window will be similar to what you see below.
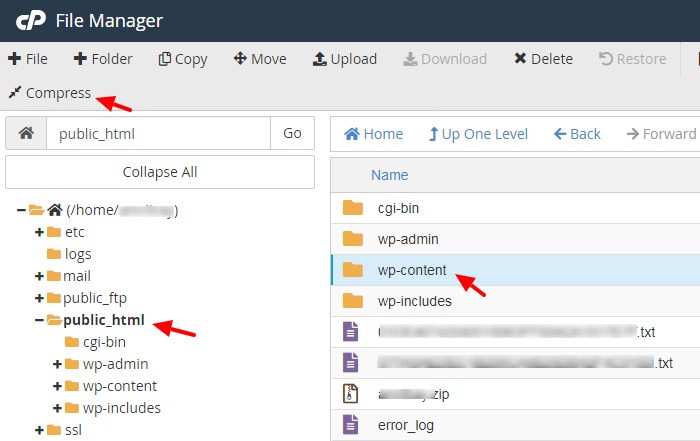
To take a local backup of the wp-content” folder, you will first expand the public_html folder by clicking on the + icon to its left. Make sure that the public_html folder is selected.
Then on the right window pane, select the wp-contentfolder. It contains all the files you need to recreate your WordPress site on a separate hosting server.
Now you want to zip the wp-content folder so that it is a smaller file to download. Therefore, make sure that this folder is still selected, and then click on the Compress icon on the toolbar.
-
Save the backup file in your public_html folder.
When you click on Compress, you get a dialog box like the one shown below.
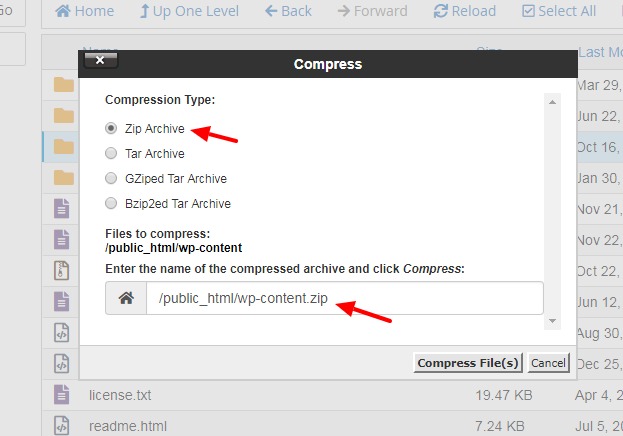
Ideally, you would choose the Compression type as Zip Archive. And next to the file name, give it a relevant name. It could be the name of your website. Anything that would let you remember what the file is all about when you access it later.
However, for this example, I would keep the file name as it is.
Once you are ready, you can click on Compress File(s), and it should zip the wp-content folder and place it in the public_html directory.
You should be able to access it from within the File Manager itself.
If you are not able to see the file, you can click on public_html on the left navigation bar again to reload the file structure. And you should find the newly zipped file there.
-
Download the backup to your local machine.
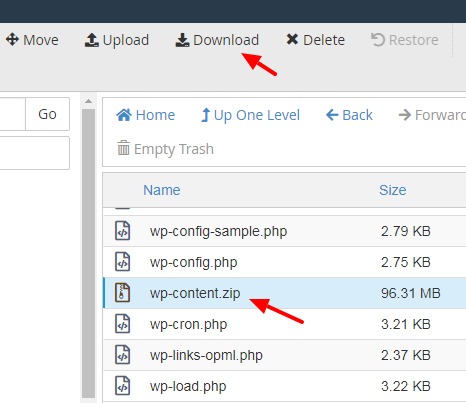
Now to download the wp-content zipped file to your local machine, simply select the file and click on Download icon on the toolbar, as shown above.
You will then be prompted to save the file to your local system. Choose an ideal location where you can retrieve it easily later.
Now you have successfully backed up your website files. Now it is time to back up the database.
-
Backing up the database file
In the following steps below we will see how to take a backup of the WordPress database file.
I am assuming you are still logged into cPanel. If you are not, then you should log in again. The steps are given above.
Once logged in, click on phpMyAdmin under the Databases tab. See the screenshot below.
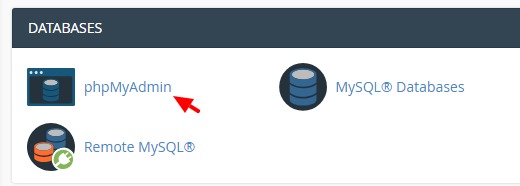
It will open the phpMyAdmin application in a new browser tab. This application basically lets you manage your MySQL database effectively using a graphical interface, which is both very easy and intuitive. You can, of course, run SQL commands too.
-
Export database.
The phpMyAdmin interface looks like the screenshot below.

The first step is to select the database name from the left navigation pane. Click on it and it will display all database tables in the right pane.
Next, we need to select all the tables that we need to export. Of course, for our WordPress site to work properly we need to select all the tables. The fastest way to do this is to check the radio box that says, “Check all / Check tables having overhead”.
The next step is to simply click on the Export button on the top menu bar.
Please Note: You don’t really need to individually select each of the tables. Just selecting the database from the left column is enough, and you can then click on the “Export” button.
-
Database Saving Options
Once you click on the Export button, you will be given the following options. See the screenshot below.
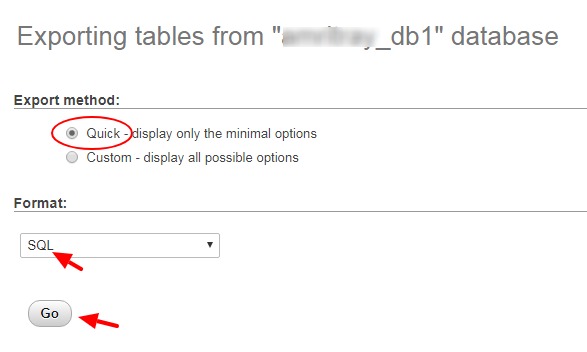
Choose the Quick option as the Export method. And keep SQL as the Format in which the file will be saved.
Then go ahead and click on the Go button. And it will prompt you to save the database file to your local system.
Give it a suitable name and save it together with the WordPress wp-content zipped file for convenience.
Now you have a fully functional backup copy of your website files and your database file. These can now be used to recreate your website on your new web server.
Step 2: Restoring the website backup on your new server
In this step, we will be actually shifting WordPress from one server to another. We now have a functional copy of your existing website. We will upload those files to your new web host.
The first requirement to get this done is to install a functional copy of the latest WordPress on your new web host.
You can see my other post here on how to do this: How To Install WordPress Manually With CPanel On Any Hosting
For this example, I am going to shift the website contents from suparnaray.com to aparna.co.in. I am using these domains because I have access to them, and they actually need to be switched.
So, I have downloaded the website backup files from the first domain, and I am going to upload it to the second one. I have already installed a fresh copy of the latest version of WordPress on the aparna.co.in domain name. See the link above on how to do this.
-
Login to the cPanel of the new domain
Login to the cPanel and then navigate to File Manager. Expand and Select public_html folder.
See Step 1 above on how to do this.
-
Delete existing wp-content folder and replace with the backed up one
Now we will delete the existing wp-content folder.
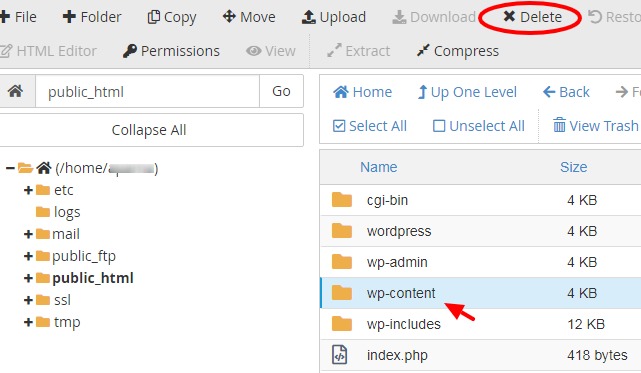
All you need to do is select the wp-content folder and click on the Delete button highlighted above.
Once it is deleted, you will need to upload your backed up wp-content folder from our older site, which we downloaded and saved in a zipped format. And unzip the file here so that it replaces the deleted wp-content folder.
To see how to upload a file to the public_html folder, see my article here.
So basically, the files have now been uploaded to the new site.
-
Delete exiting database
Navigate to your phpMyAdmin interface (see “Backing up the database file” above if you are unsure on how to do this.)
You have all the database tables from your new install, which we want to delete. As we want to upload the existing database from our previous site that we are transferring.
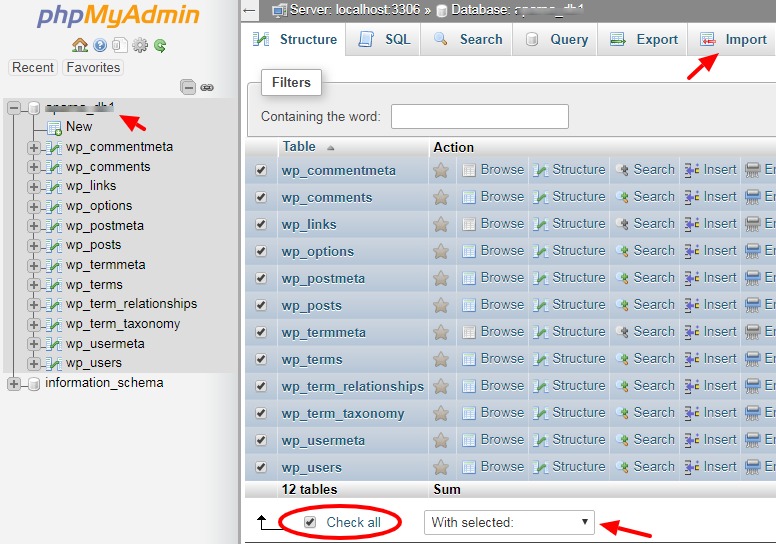
To delete all the database files, first select the database name. It will highlight all the database tables as shown in the diagram above.
Second, click on the “Check all” button to select all the tables in the database.
Then, expand the dropdown menu that says, “With Selected:” and chose the Drop option.
You will be prompted with a confirmation, Do you really want to execute the following query? Click on Yes to confirm.
It will drop all tables from the database.
Next, you will click on Import to import our existing database.
-
Import your existing database
When you click on Import, you will be prompted to choose a database from your local system.
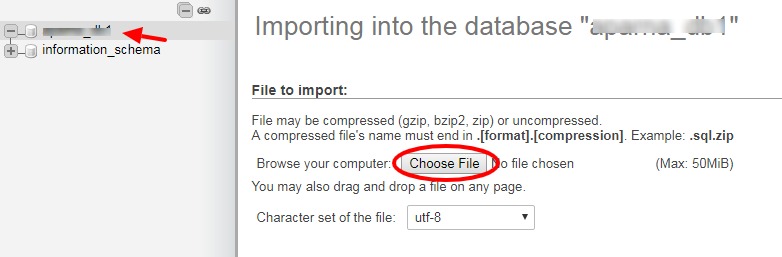
You will click on “Choose File” and select the database backup file from the site we want to restore.
Keep the default options selected. No need to change those. Then scroll down the page and click on Go to start the import process.
Once successfully imported, you will get a message like this:

Please note: Ensure that you have the database selected before you import. Otherwise, you will get an error, saying that no database has been selected.
-
Check whether the table prefixes match
Table prefix is the part that comes before each WordPress table name.

A look at the table names from the database that we have just imported shows that the tables have a prefix of uj5mbp7nl_.
During a fresh install the table prefix is always wp_. We can also verify the same by looking at the existing wp-config.php file.
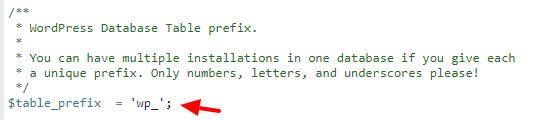
The $table_prefix constant has a value of “wp_”.
Therefore, the existing table prefix value does not match the newly imported one. There are two things we can do here.
Either we can update the new table prefix in the wp-config.php file. To do that simply change the wp_ value to the new table prefix in the file above. See the above diagram.
Or you can change the actual database prefix to wp_.
We will learn how to change MySQL table prefix in WordPress using phpMyAdmin.
In phpMyAdmin first, select your database, and then click on “Check All” radio button at the bottom of the tables to select all tables. See the first diagram in “Delete Existing Database” section above for details.
From the “With Selected” dropdown menu, select “Replace Table Prefix” option. And you should get a dialog box as shown below.
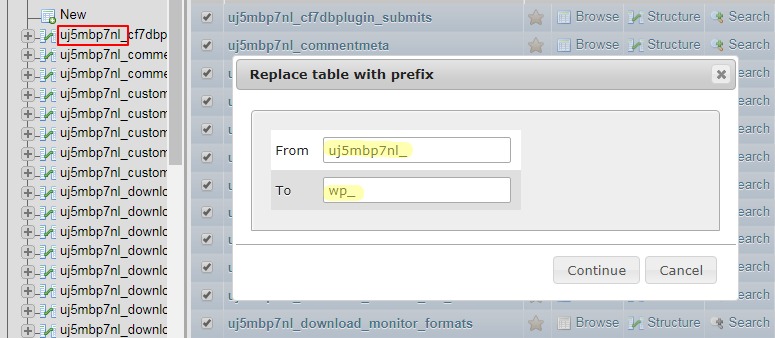
In the Replace table with prefix dialog box, in the From text field, input the prefix that you want to replace. And in the To field input the prefix that you want to replace it with.
Click on Continue and it is done.
You have replaced the database prefix with a new one. You may have to reload phpMyAdmin for the changes to reflect on your screen.
Please note: At the end of the day, you need to make sure that the actual database prefix, and the value mentioned for the constant $table_prefix in the wp-config.php file is the same.
With these steps, we have successfully completed the steps required to move a site from one server to another.
However, there is one more step required if you are moving your WordPress site from one domain to another. Let’s look at it in detail now.
How to copy a WordPress site from one domain to another
This step is only necessary if you are changing the domain name of your WordPress site.
We get questions like these often: How to transfer a website from one domain to another?
To move a WordPress site to a new domain, you will allocate hosting to the new domain. Take a backup of the old domain and transfer it to the new hosting. Essentially, you will follow all the steps outlined above.
In addition to that, we will also make sure that we replace the reference of the old domain name with the new one everywhere in the database.
To do that we will log into phpMyAdmin and select the database we are dealing with. That is the database that we are moving from the old domain to the new domain. In other words, the database, we have just uploaded to the new domain.
If you are following along, you will know that we are shifting from suparnaray.com to the aparna.co.in domain. So, when we go into the database, you can see that we still have reference to the old domain.
At this point in time, you won’t be able to log into the WordPress admin Dashboard. Because when you do that, it will automatically redirect you back to the old domain.
To be able to login to the Admin Dashboard, you at least need to update the domain name in two places. One is the siteurl and the other is the home.
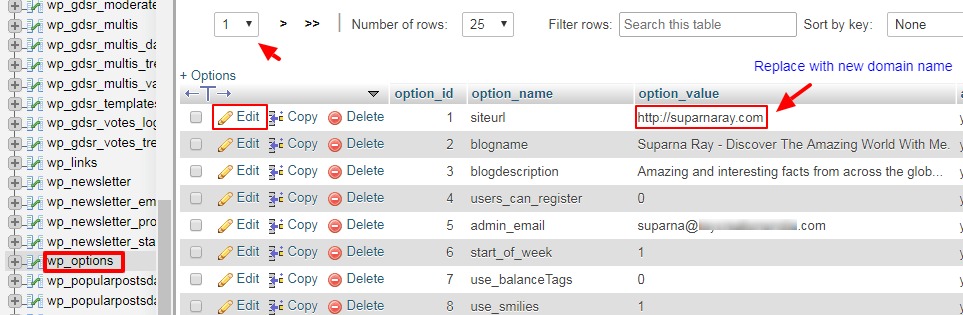
Login to the phpMyAdmin interface, select your database name, and then select the wp_options table as shown in the diagram above.
Click on Edit next to the siteurl and update the value from http://suparnaray.com to https://aparna.co.in
We are updating the domain from the old to the new one. So essentially, we are transferring the website from one domain to the other.
We also need to update the value similarly for the home variable. You may find this variable on the same page or in subsequent pages. In such a case, you can navigate to the other pages using the dropdown menu or the navigation arrows as highlighted in the above diagram.
Once these two values are updated, you can now log in to the Admin Dashboard.
Remember, there are many other instances of the old domain still existing in the database. But we will replace those with the new domain using a Search & Replace plugin, to save us time and energy.
Bulk Search & Replace using plugin
Next login to your admin Dashboard using the new domain now. You will use the same credentials as you had with your old domain. Since we replaced the database, everything from your old domain got ported to the new domain, including your admin credentials.
Go to Plugins > Add New and search for Better Search Replace
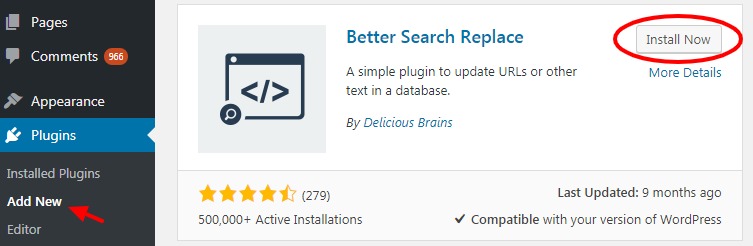
Click on Install Now to install it on the site. Once installed, click on Activate to activate the plugin.
Now go to Tools > Better Search Replace to access the plugin page.
We will use it to search for all instances of the old domain name in the database and replace it with the newer domain name.
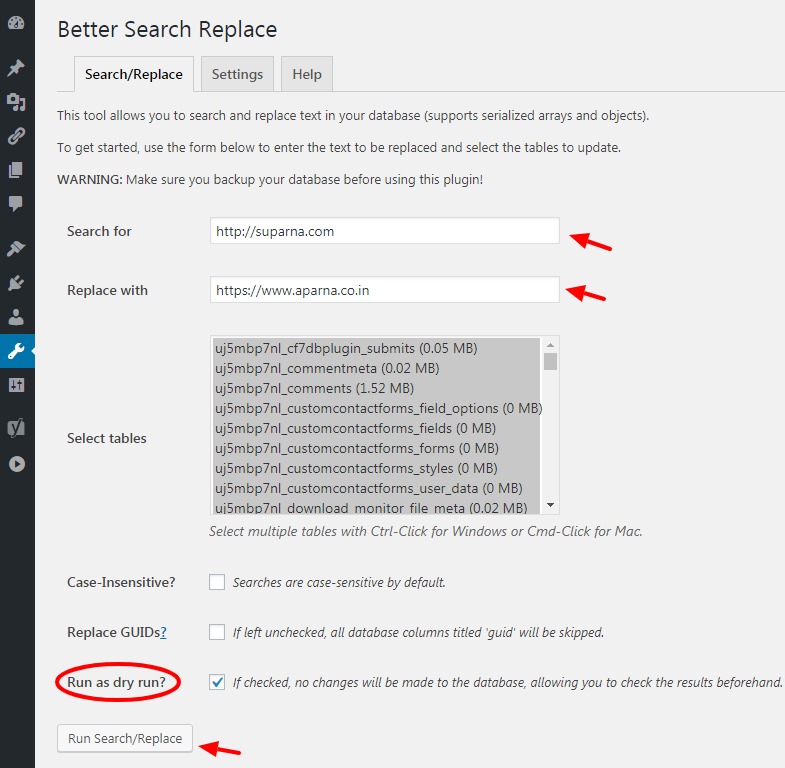
Let me quickly run you through the settings.
Search for text field is for your older domain name. Replace with is for your new domain name.
For Select tables you need to select all the tables. Simply click anywhere in the box and use the key combination Ctrl+A on windows.
Keep the checkbox selected for Run as dry run? when you want to test out the results without actually affecting the database.
When you are finally satisfied with the results, you can uncheck this checkbox and click on Run Search/Replace to make permanent changes to the database.
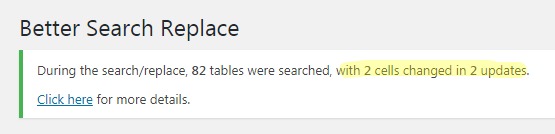
You will get a similar set of results once the update has completed.
And with this, you have successfully transferred a WordPress website from one domain to another.
Conclusion
In this article, we have covered two major points.
- Shifting WordPress from one server to another, and
- How to copy a WordPress site from one domain to another
I have written this article in such a way that anyone with the least technical knowledge or skills can accomplish these tasks by following the step by step instructions with detailed diagrams.
However, if anything is unclear, or you need further help, please use the comment sections below. I will be more than happy to help.
Thanks and over to you now.
Leave a Reply